How to increase computer speed and performance

ways to increase your computer  speed

there  are many ways to boost computer speed
1. improving your hard disk

the hard disk is a vital component which can dictate your computers performance.
the hard disk should be free of any viruses which reduce the speed of the computer. a virus is a malicious sent to a computer to do malicious activities in the background. Hence there is a great need of making your computer free of any viruses. this can be done by either by formatting the computer or using antiviruses.. it is recommended that you install your computer with an antivirus. there are different antivirus software in the market today. some of the best are

  • avast
  • kapserskey
  • smardav
  •  mcafee

that is just to mention a few.. this antiviruses must be updated regularly.

make sure that your computer hard disk has more than 15% of the total capacity. if it is less than the specified you can try to buy a new hard disk or delete programs that are not being used in the computer.

2. try using speed boosting software.
3. regularly leave your computer on standby mode for your computer to scan for malicious software

How to Use Software after ending Trial Period

In our daily work on computer we need lots of software and games. Which we find On Internet, and most of them are available in trial mode, means they offers 15 day or 30 day trial period for user testing.

When the trial period is expired you need to enter a serial number or purchase the software to continue using the software and games; that is hard to find a serial numbers for free and in this situation you need to buy a serial key to continue using the software.

But most of the times we cannot afford to buy the license key because of high price and limited time period and you are not able to use your favorite software or games. But no need to get upset as there is some way to extend or reset trial period of any software and today in this article we are going to describe how to extend or reset trial period of any software. With this tricks you can use your favorite software or games forever without expired.
To do this please follow the below steps to extend your software time period.
How to extend your Software Trial Period

Delete Registry entry to Extend Trial Period:

In this method you need to find and delete your trial software registry. After trial period is expired, uninstall the software and follow the steps.
  • After uninstalling software, Open RUN (Windows key + R) and type regedit and hit Enter.
  • Now Registry Editor Window will appear and here navigate to HKEY_LOCAL_MACHINE SOFTWARE Your Software name from left pane of this window. If you find any Key name with your software name then just Delete that Key.
  • Similarly navigate to HKEY_CURRENT_USER Software Your Software name and if you find any key with your software name then just Delete it and close the Registry Editor window.
  • Again go to RUN and type %temp% and hit Enter.
  • Now Delete all the things in that folder. Don’t worry these are the temporary files and not necessary for your operating system.
  • Now go to C:Usersyour username hereAppData. Under AppData open all three folders “Local”, “LocalLow” and “Roaming” and check. Under these three folders if you find any folder or anything with your Software’s name, just delete it.
  • Now Restart your PC and install the expired software and you can use it again for trial period. If you install the expired software without following the above steps then you don’t get trial period back.

Reset Trial Period Using Time Stopper Software:

Time Stopper is a popular software which has been created exactly for the Stopping the time of trial software. If the trial period has already ended then the Time Stopper is not able to reverse the trial mode of the software. Time Stopper only can stop the trial time when it is used. Using Time Stopper is quite easy just follow the steps:
  • In the Choose the new date option set the date as your wish. You can choose tomorrow as the date.
  • Now enter your software name and then click on Create desktop short-cut and use this shortcut to open the trial version software.

Extend Trial Period Using RunAsDate software:

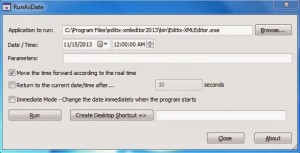
RunAsDate is very similar small utility to Time Stopper which allows you to run a program in the date and time that you specify. It’s a portable program so you don’t need to install it.

This utility doesn’t change the current system date and time of your computer, it only injects the date/time that you specify into the desired application. Another advantage of this program is that, you can run multiple applications simultaneously, each application works with different date and time, while the real date/time of your system continues to run normally. Now follow the steps to use RunAsDate.

  • Now Specify date and time and hit the Run button to execute the app on the specified date and time. You can also create a desktop shortcut to open the trial software.
  • After running the software using RunAsDate, don’t run it directly. If runs it directly without RunAsDate then trial period is ended instantly. To avoid any chances of running the software program directly, you can delete its shortcut from the desktop and create a new shortcut using RunAsDate and place it on the desktop.

The above methods will not be able to get you complete version of the software. If you use trial version of the software with limitation, then this methods will help you to extend or reset the trial period of the software
we are suggesting these ways only for people who want to evaluate the software for more than its default trial period and then buy the software. It is always recommended to buy the software if you like it because it will help the developers keep the software up to date

how to clean your p.c, remove all your residual junk file in your p.c

Today i’m gonna teach you how to clean your p.c
and remove all your residual junk file in your p.c

and also to install free antivirus
and registered it for one year without any money
you just need a gmail account

so let just get started..!!!!!!!

Steps to delete residual junk files that may slow down yor p.c or  laptop by using ram memory
1. firstly you have to go to start menu on the desktop or you can press windows+r
button at the same time
2.this are the unused file that may slow down your pc
so just select all the files by cntrl+a this will select all the files
3.then after that you just need to delete these files by cntrl+d
this way you can speed up you computer & also free ur ram memory

now i’m gonna show you how to download a free antivirus software an register it for 365 days or 1 year
1.go the google.com download the avast free antivirus software
or you can directly download the software by going to link given below in the description
2.once you downloaded the software install it.
3.its gonna take some couple of minutes……!!!!!!!!!!!!!!!!
4. once you got this screen
click on install.
the antivirus is been processed.
this may take 10 to 15 minutes…
wait for it..!!!!!
once your software is been installed

this page will show up

5. you have open avast free antivirus software that you have just installed
6. go to settings in it an open

7. there you will find 4th option of registration click on that
8.after opening the registration there you can seen free antivirus is been valid for only 30 day or  one month
after that you will have to re install the software

9.you can register an get a free 365 day service or registration free

10. click on the option
register now in the same page under registration you can buy the services
11. if you want free registration come to the home page of the software i.e

at the top you can see register option click on that
once you see the STANDARD PROTECTION click on that
this page will pop-up

then fill up  you email id

once you press register option this will popup
then select no thanks option

(now you will need to open your email and activate) your free antivirus for one year for absolutely free
you can skip this step….!!!!!!!

now lets check
open the software

open settings>registration>free registration for one year

How to clean your laptop at home

Are you fed up with the slow performance of your laptop? Is your laptop over heating so much that you’re unable to work? Do you want your laptop to work the way it used to when it was brand new? It’s time for you to do some laptop maintenance. Your laptop, after many months of use might be filled with dust and that dust clogs the ventilation resulting in your device overheating and showing a reduction in performance.
STEP 1: 
How to clean your laptopHere are all the basic requirements for the job. Which are already mentioned above, we have used an HP Laptop and the process may vary depending on the model of your laptop. Make sure you wear a static band while handling the internals to avoid static discharge.
STEP 2: 
Start by referring to your laptop’s manual or watch disassembly videos for your laptop to get familiar with the process. Unscrew whichever screws are mentioned by the manual and then slide the plastic covering which will allow you to open your laptop.
How to clean your laptopSTEP 3: 
Remove the cable which is connecting your hard drive to your laptop as shown in the picture. Be careful and gentle with the wiring as it is very delicate in strength and try to pull the wire using the black plastic strip which is attached to the connector. It should pop out easily.

STEP 4:
When removing the hard drive make sure you are careful. Hard drives are prone to damage from physical shock and the same can be said for every other component. But when your precious data is at stake you know it’s best to be as careful as you can be.
STEP 5: 
How to clean your laptopWhen you want to remove your RAM the easiest way is by unlocking the clips from both sides of the module and then when the RAM pops out from its position just remove it. Your laptop might have one or two modules situated one above the other. Remove both.
STEP 6: 
How to clean your laptopUnscrew your Wireless/Bluetooth Chip and gently remove it, make sure you remove the cables marked 1 and 2 carefully and remember which cable fits on which side. Remember to reconnect them during reassembly as these are the antennae for your Wi-Fi / Bluetooth.

STEP 7: 
Remove all screws on board and make sure you remember the specific screws and where the exact one fits as you might end up putting the wrong screws and destroying the threads in the plastic screw slots of your laptop.
STEP 8:
How to clean your laptopWhen all the screws are removed, take out the DVD drive which is attached to your laptop. In this case we have an extra hard disk attached to the laptop in the multibay slot. So just slide it gently and it should pop out.
STEP 9:

How to clean your laptop

Once you’ve taken out the hard drives and plastic panels you might come across more screws. Remove these as well. Be careful and don’t remove screws that are not required for moving to the next step as you might cause damage.
STEP 10: 
Using any sharp plastic object like a guitar pick or plastic card and slide it in the slit between the keyboard and the chassis. The keyboard should pop out easily. You might have to slide the keyboard upwards or downwards.
STEP 11:
How to clean your laptopUnplug your keyboard from the base. Handle the Flat Ribbon Cable (FRC) with caution, just refer to your laptop manual to find out the socket mechanism and then try to remove the FRC. Also, remove the FRC which is connected to your touchpad and power button.

How to clean your laptopSTEP 12: 
Remove all the screws on board and make sure the frame is not held by any of them because if you miss even one screw and try popping the chassic, the cumulative stress on the plastic frame might just rip it straight out. So that’s another thing to be careful about.

How to care for laptop/computers

How to care for laptop/computers we aimed for users who feel annoyed at these devices that decreased performance or becomes slow / slow. By reading this article, in the hope that the users computer / PC or laptop will be able to return your device to enjoy it to the maximum Prominent.

How to care for laptop/computers

Usually computers and laptops which decreased performance be on the mark with the length of booting or loading the longer the time to open the computer and run programs that exist in it.

How to care for the computer and a laptop that is slow

Decrease Performance of the computer or your laptop, of course, happened because there cause. Some of the factors causing the decline in the performance of a computer or laptop such as the number of junk files (cache), a virus, dirty because of dust, too many programs are installed, etc. If it is on leave, it will interfere with the smooth running of your work and comfort in using a PC / laptop. In addition to ticks, with the weakening performance of the PC / laptop can also cause the device to be easily damaged.

For those of you who have a computer / PC or laptop that is experiencing the problem, there are several ways to restore the performance of your device. In order for your computer back to work quickly, how to do almost the same as how to create android is not slow we’ve previously reviewed.

Some of the ways that the computer back to normal, the steps that must be done only through a desktop computer monitor / PC or laptop with ease.

Remove / Uninstall programs that are not needed: Installing software or program that is only used one time or rarely used will increase the burden on the computer. It would be nice if the programs are not important to remove / uninstall to free up drive space on your computer / laptop. Install the program / software which is important just to let the computer / laptop is more efficient so that the device is working with the maximum.

To perform the abolition of programs you do not want, click Star Windows and then select Control Panel, select the install / uninstall a program or select Programs and Features, depending on the type of OS Windows installed on a computer / laptop. You can click on the program you do not want and then uninstall the program. However, if you are in doubt, leave it better than the error occurred deleting important programs.


Delete temporary files and files not in need: Every time you use the internet and visit websites, then the computer will leave the history file. With so many browsing history and bookmarks will also result in excessive computer / laptop becomes slow when opening the application. Therefore, delete internet browsing history and bookmark the web page as needed.

To conduct this removal, you click My Computer and then right click on drive C. Select Properties, click Disk Cleanup and check / select all users and click OK. Usually, it will take some time to open disk Cleanup.

Perform Defrag (Defragmenter): Disk Defragmenter is a Windows default tool whose function rearranges the files have been scattered in the hard drive that is done intentionally or unintentionally by the users computer / laptop. This is caused by copying activity, to delete, move files on the computer and perform the install program and activities management other files. By doing a defrag on a regular basis, it will reorganize the files on the hard drive cluttered put the file back together.

To defrag, you click on My Computer, select Properties, select Tools, then select defrag. On display, you can select the drive C, drive D, or the System Reserved, and then click defrag / optimize.

Scan for Viruses, Spyware, or other malware: To keep the computer / laptop from viruses or other malicious malware attack the system, you can run an antivirus scan. The dangers of malware on the computer or laptop not only will make the computer become slow. Moreover, a nasty virus on the OS also can damage the system and damaging your laptop device.

To secure your computer or laptop, choose the best antivirus for computers and laptops that has been trusted to prevent virus attacks computer and laptops.

To undertake measures to clean your computer / PC or laptop in order not to slow / slow performance should be performed routinely. For home computers, can be done every 3 months to keep your computer in order to keep working optimally. As for the office computer, can be made 1 week to keep the computer in order to remain stable.

As for the laptop can be seen from its use. If often in use, clean and check the OS can be done as often as possible so that laptops remain durable and stable performance.

Troubleshoot ‘no display’ problem of your computer

Now troubleshoot your computer’s “no display” problem by your own

People usually call a computer technician when they found, that there is no display on their computer screen after booting, its a very serious problem and without any display you cannot operate your computer. Its a very common problem people face using computer and nowadays without computer our life seems to be impossible. Many people earning for living from their home by using computer, for them every seconds count.

Read ore on Troubleshoot ‘no display’ problem of your computer

Here is a complete guide how to troubleshoot your computer’s “no display” problem by your own without any computer hardware troubleshooting degree or any experience.

List of tools you need

1) Screwdriver set
2) Digital multimeter
3) Brush

Note : Power on the computer

Step 1

Now the first thing you should check if the monitor’s power LED is onn or off. If You see the LED is onn then your monitor is getting power. If the power LED is off try another power cord to check, is it your monitor’s power cord needed to be change or if it still does’nt work with a new power cord then its time to change the monitor.

Tip : Check the plugin board from where the computer is getting power, may be the problem is in the switchboard and not in the computer

So If your monitor is getting power and there is still no display lets move to step 2

Step 2

So now the next thing we’ll check is the VGA of the computer.Carefully remove the VGA cord from the monitor, if now you can see its displaying (No signal) or some words dancing on the screen then its seems to be the monitor’s VGA is fine.

Tip : Check with a new VGA cord to make sure the old VGA cord is working or not.

Now, that you know the monitor is not responsible for the problem, we can move a step ahead

Note : Cut power off from the computer

Now use the screwdriver to open the desktop cabinet cover with the motherboard facing upwards, so you can see all the components inside the cabinet.

Tip: Use the brush to clean the dust inside the cabinet

Step 3

Now carefully take the RAM out from the slot, rub gently the chip of the RAM with an eraser (the one we use to erase pencil marks). Now power on the computer and check if the display is back or not (most of the time display problem occurs due to rust on the RAM chip). If there is still no display on the monitor, use the multi meter to check the voltage of RAM, if not use another SMPS.

Tip : If there is still no voltage in the RAM slot even after trying with a new SMPS, the problem can be in the RAM slot.

There is another possibility, that if the system has been upgraded recently, may be you need more powerful Ram.

By following this guide you can troubleshoot your own computer and skip paying to a technician and also you can save a lot of time, even you can earn some extra cash by helping people troubleshooting their computer problem.

How to do a Split Screen on a Mac

Whether you have an IMac, Macbook Pro or Macbook Air, all users want to view multiple content at once.  In all reality, most places today you will find users are working with dual monitors which increases productivity and viewing multiple files at once.  As for myself, at my employment, I prefer having my Outlook on one screen and my desktop on the other.  But lets get back talking about Macs.

The majority of Mac users probably only have the one screen, so Apple made it an option that you could split your screen between two applications.  For an example:  If your a student drafting a paper, you could open Safari and Pages, split the screen so you could view both applications at once.  In result, this will increase productivity instead of continuously remembering information and switching screens to draft your paper.  Please view the below video for a visual.  What do you think and how could you use the split screen option to better your work?

How to create new drive in my computer without formatting

Add another drive in your computer without formatting the whole system. 
 
Many people who are tech savvy but still there is always something to learn more. I saw people formatting there whole system to just add another drive in their computer. Let say you have two drives in your system (C:) and (E:). Now you want to add another drive. So here many people format the whole computer to just add another drive. As I said earlier there always something to learn. So here I am to guide you how to add another drive without formatting your entire system which can save you a lot of time.
Tip : First thing you need to do is backup all the data from drive (E:), because here we are going to break it up so we can create a new drive
Here is the step by step guide      
 
Step 1 : Right click on computer icon and then a menu box will appear. Click on manage and   will take you to the computer management window
Step 2 : Now click on storage and then click on disk management. There you can see all the partitions currently having in your computer.
Step 3 : Now select which drive you want to partition here we are partitioning drive (E:) so right click on it, then click on shrink volume.
Step 4 : After system queries the drive, a new window will appear, which shows the size of the drive before and followed by the available shrink space. In the 3rd line you can enter the amount of space you want in your new drive.
Step 5 : After putting all the values click on shrink and wait.
This may take some time depending on size of the drive to be shrunk
Once its done a new window will appear which shows the new unallocated space. Right click on the uncatalogued space and then select the option New Simple Volume 
Step 6 : Now the New Simple Volume Wizard will appear, click next. Then enter the same value you used to shrunk
Step 7 : Assign a letter to the newly created drive of your choice, click next.
Step 8 : Now a format page will appear and make sure file system selected is NTFS, click next.
Step 9 : Now its done, you can see a summary page displayed on your screen, now you can simply click finish.
This is how you can create partition without full formatting or using any software.